How To Make a Mitered Edge
Insertion lace is flat and meant to be sewn on both sides, as is the lace I used. This lace would not work in real life, but thought it ok for a how to. Edging lace has one flat side and the other side is scalloped. The main point here is how to miter the corner so I hope its ok. |
Step One: Zig-zag the lace to the finished edge
down to the corner. |
Step Two: Extend the lace down, the same measurment as the lace is wide,
mark your lace. |
Step Three: Stitch from corner to outside corner as soon. |
Step Four: Continue sewing down other side. Trim the excess lace from
the corner, press well. |
Step Five: Finished lace attached. |

Saturday, April 27, 2013
TODAYS TIP
Thought it might be fun to share some of my quick tips. I use this method for applying lace and love how easy it is.
Thursday, April 25, 2013
SUMMER TIME
And the livin is easy--It gets a lot easier if you whip up some shorts for the kids to live in this summer. No need to buy, even if you are new to sewing the following instructions will walk you right through sewing shorts.
 This is such a cute set sewn by my friend Jerry for her granddaughter.
Looks very expensive. A perfect project for a beginner seamstress.
We will show you how.

Looks very expensive. A perfect project for a beginner seamstress.
We will show you how.
How To Make Children's Shorts
This "how to" was contributed by Marilyn Mac.
Thanks Marilyn for putting this together for the site.
|
|
Step One:
Cut out front and back of shorts making sure that pattern arrows are on the straight of the grain ( this is the directions that the threads are going) you can also cut them on crossgrain with most fabrics ( this is sideway) 
|
|
Step Two: Sew front and back seams to just below notch.  |
|
Step Three: What I do next is open up shorts front and back and align side seam.. I stitch side seams then I stitch inside leg seams ( see photo below).  |
|
Step Four: If you have a serger , serge side seams and inside leg seam. Next you are going to finish sewing the front and back seams from the front notch to the back notch.. Remember where you left off when you were sewing the center seam?? Yes ( see photo below)  |
|
Step Five: Next 2 pictures show how to make the side slit.. You don't need to add these if you don't want, but if you want to make them.. When sewing the side seams I left about 2" open at the leg end of the seam. Turn shorts inside out..clip seam all the way to seamline with out cutting thru seam. fold under 1/4" of open seam then 1/4" again and press.. do this for both legs.. Then top stitch on fold. I usually make a V where seam begins.( see photo below) 

|
|
Step Six: Waistband.. If you have a serger serge waist of shorts.. If you don't you need to press 1/4" of waist.. Next turn waist down 1" and press. I usually use 2 pieces of 1/4" elastic for waist.. you can also use 1 piece of 3/4" elastic.. for 3/4" elastic.. stitch down waist closest to the serged or 1/4" folded edge leaving 1 1/2" open at back to insert elastic. cut elastic waist measurement + 1". I usually attatch a safety pin to end of elastic and thread it thru opening.. being carefull to keep other end of elastic outside the casing.. Once elastic is completely thru casing make sure that it's not twisted.. Overlap ends of elastic and zigzag together.. Then topstitch back opening closed.. for 1/4" elastic you basically do the same as above except you add another row of stitching 1/2" from the edge of waist leaving, again the 1 1/2" opening.. Insert elastic closest to the top of the waist first.. Joining elastic as above.. then close the middle opening.. Insert bottom elastic as above, join, close bottom opening. Hope this is clear. If you have any questions feel free to post. I try to check the site every day..  |
Finished Shorts: |
| |
Saturday, April 20, 2013
PILLOWCASE DRESS
Our SAGA group chose the pillowcase dress to do to give to charity. It is a quick and fun dress to sew. The instruction are very detailed so I will send you to the link for the instructions you can print off.
 I added bloomers to Zoe's dress, just kind of cute I think.
http://www.everythingsewing.net/pillowcase_dress_how_to.htm
That link should take you to the instruction enjoy.

http://www.everythingsewing.net/pillowcase_dress_how_to.htm
That link should take you to the instruction enjoy.
Thursday, April 18, 2013
Warning, if you are organized don't look!
It has probably been over a year since I have sewn anything using a pattern. So, I decided it is time to get back to sewing clothes for the kids/grand kids.
I had planned over flannel from Otto's quilt knowing I wanted to make him some jammies. I knew I had the pattern as I have sewn jammies for all the kids. Well!! it was not to be found!! I dug and dug and no size one jammie pattern was to be found. Send off a quick email to sewing friend " can I use the sweat suit pattern for jammies if I am using flannel"? Email came back "dig Nonie dig". That was no help, so I dug.
 This drawer usually only holds the patterns in the size I am using at present, but I dug anyhow.
 So far this is what I have come up with. These sizes will not even begin to work. Well, with the exception of the kwik-sew pattern but it uses knit fabric. So either way, I need a trip to the fabric store either for a pattern or knit fabric--Maybe both???
So that is where I am right now!!
I had planned over flannel from Otto's quilt knowing I wanted to make him some jammies. I knew I had the pattern as I have sewn jammies for all the kids. Well!! it was not to be found!! I dug and dug and no size one jammie pattern was to be found. Send off a quick email to sewing friend " can I use the sweat suit pattern for jammies if I am using flannel"? Email came back "dig Nonie dig". That was no help, so I dug.


So that is where I am right now!!
Wednesday, April 17, 2013
A sign of the past
I love history and anything from the past years. I find this is not a good part of the country as far as saving anything 'old'. If it is an old building the thought is tear it down build something new. I really dislike that train of thought.
So, when a person of great wealth started projects that saved a few small area's it was exciting.
But, now, the most exciting project is comimg to a finish. It is called the Pybus market after the original owner of this once used metal shop. The building was so old, just a total eye sore but tucked out of the way of everyday traffic so it didn't bother anyone.
 I am more then excited about this old sign. This was the original sign that hung on the outside of the building. Found rotting in the dirt-my son was picked to 'save the sign. Since he is an artist you might think he would re-paint it but saving it was the goal not making something new. It took many hours of work and the sign will now hang inside the building, away from the elements.
This is an idea of how the market will look. Opening day is May 11th I think.
 I will get more pictures of the market in the future.
So, when a person of great wealth started projects that saved a few small area's it was exciting.
But, now, the most exciting project is comimg to a finish. It is called the Pybus market after the original owner of this once used metal shop. The building was so old, just a total eye sore but tucked out of the way of everyday traffic so it didn't bother anyone.

This is an idea of how the market will look. Opening day is May 11th I think.

Tuesday, April 16, 2013
But, what is it?
You know how you make this great project and everyone that see's it try's so hard to be polite and say how nice it is?
But, you can tell by the look in their eye they do not have a clue of what it is?
Well, that's just what I have been going through. I think I am late to the party of making these mug mats, because I see them on so many sewing places.
 They are larger then a coaster and smaller then a place mat, so they are just perfect for snack time. I want to use mine when I snack outside.
 I won't need to worry about what might be on the picnic table, just put down my mat and snack away.
 As you can see I have gotten a little carried away making these. I think I like the red better then the yellow thread. The fabric is called "Recipe for friendship" by Mary Engelbreit.
But, you can tell by the look in their eye they do not have a clue of what it is?
Well, that's just what I have been going through. I think I am late to the party of making these mug mats, because I see them on so many sewing places.


Saturday, April 13, 2013
Happy News
My friend Martha, has started a wonderful new blog called, http://www.sunshinehappynews.blogspot.com/Her nine year old grandaughter Trinity came up with the name, it is so needed in this day of not so happy news.
I borrowed this picture from her blog.
 I hope you all send her your happy news so we can help her blog grow.
I borrowed this picture from her blog.
Saturday, April 6, 2013
Flower or Weed?
What do you see? Flowers or weeds? I know these little yellow flowers can be invasive, and don't really care where they grow.
When, a small hand filled with gold reaches up and say's "Here Grandma, these are for you" I see the most beautiful bouquet in the world.
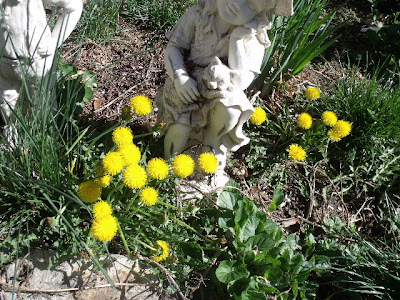 I was so sad when I heard my granddaughter had picked a bouquet for her teacher, and the teacher told her "those are just weeds"
 The teacher missed out on seeing the beauty of a gift given by a precious child that did see the beauty.
I hope you see a beautiful flower.
When, a small hand filled with gold reaches up and say's "Here Grandma, these are for you" I see the most beautiful bouquet in the world.


I hope you see a beautiful flower.
Tuesday, April 2, 2013
Spring
Spring has come to our valley. I just love letting it all soak into my soul.
 Flowering cherry, always the first tree to bloom.
 Who doesn't love daffodils so pretty.
 The sweet violets, that are so shy it is hard to get a picture of them but they fill the yard with their beautiful perfume.

This is called "saddlerock" the view from my kitchen window.
 I think I live in a paradise.


This is called "saddlerock" the view from my kitchen window.

Subscribe to:
Posts (Atom)