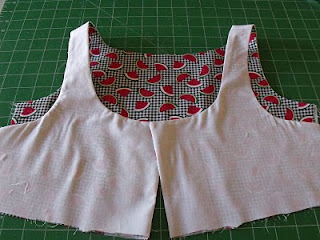
I started summer sewing, Ya for me!! The top I started to make for Zoe is McCall's M5573. Reading the instruction sheet, the first thing I see I will change is the way the top is lined. Now they have instructions to sew the lining together, then sew the top together. Sew the lining in leaving the shoulders unsewn. Then you are supposed to sew the top and slip stitch the lining UGH!! This method has never worked out for me. So I will show you my method to having a lining neat on the inside.
 Sew the shoulder seams of both the fashion fabric and the lining. Then lay the pieces right side together and stitch up the front, around the neck edge and sew the armhole. You will be leaving the side seams open at this point.
 Now, trim and clip your seams. I like to use pinking shears so I trim and clip all in one operation.
 Hard to get a good picture for you. You will reach up the open back and pull the front through the shoulder.
 There, you now have the lining turned. Remember the side seams are still open, so we will finish those next.
 Meet fabric to fabric and lining to lining and sew in one continuous seam. Finish seam, press and you have a nice neat lined top.


Great tute, Nonie. Thanks so much. I have to line a top soon and will try your method.
ReplyDeleteThis is the way I do it too, Nonie. I don't like slip-stitching my lining either. This way looks so much more neat. And it's nicer doing it this way because then the lining is separate from the fashion fabric at the bottom even under the arms so it can be folded under and stitched down if you ever add a skirt to hide a waist seam.
ReplyDeleteGreat tute! Your pictures are so easy to understand.
Great tutorial - thanks a million!
ReplyDeleteThank u
ReplyDeletein which part did you do the understitching?
ReplyDeletein which part did you do the understitching?
ReplyDeleteI've started lining bodices almost every time. It's so much tidier, and easier, than facings. I learned how by making 18" doll clothes, if you can believe that. I translated what I learned to my own clothes and am much happier with the results.
ReplyDeleteGood post, Nonie! This is the way I did Ellie's outfit, but it had the flutter sleeve, and it would not go through the shoulder like that. So I had to do a bias binding under the arms.
ReplyDeletehttps://prayersformymom.blogspot.com/